This post may contain affiliate links. Please see our disclosure policy.
Have you ever felt stuck in your genealogy research, wondering why you can’t seem to find information on that brick wall ancestor? The answer might lie not in your direct family line, but in the connections surrounding your ancestors.

Ancestry.com has introduced a powerful new tool called “Networks” that helps genealogists explore these connections in an organized way. I’ll walk you through what Networks is, why it matters to your research, and exactly how to use it to potentially break through those frustrating brick walls.
Table of Contents
What is Ancestry.com’s Networks Tool?
The Networks tool allows genealogists to identify and incorporate individuals who were important to our ancestors but weren’t necessarily part of their immediate family. While traditional genealogy research focuses on direct family lines (parents, grandparents, great-grandparents, etc.), our ancestors didn’t live in isolation—they were part of communities that influenced their decisions, movements, and life choices.
If you’re familiar with Elizabeth Mills’ FAN principle (Friends, Associates, and Neighbors), Networks is essentially a digital tool that helps you apply this methodology in a more structured way. It provides an organized system for capturing information about the people in your ancestors’ social circles, helping you understand how these connections may have impacted their lives.
Why the Networks Tool Matters for Your Research
As genealogists, we often hit roadblocks when focusing exclusively on direct ancestors. The Networks approach can help you:
- Identify patterns in migration, occupation, or social connections
- Discover new record sets you hadn’t considered
- Generate fresh research theories for breaking through brick walls
- Understand the social context of your ancestors’ lives
- Document complex relationships that might reveal unknown family connections
Before Networks, many researchers (myself included) used spreadsheets or other manual systems to track these connections. Having this functionality built directly into Ancestry’s platform streamlines the process and provides visual tools that can spark new insights.
How to Access and Set Up Ancestry.com’s Networks
The Networks tool is currently available as part of Ancestry’s Pro Tools subscription. Here’s how to find and start using it:
Accessing Networks:
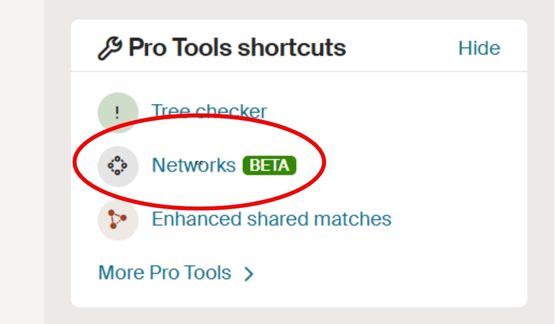
- Log in to your Ancestry.com account (Pro Tools subscription required)
- Look for the “Networks” tab on the right sidebar of your homepage
- Click to enter the Networks homepage
You can also access Networks directly from an ancestor’s profile page:
- Navigate to the ancestor’s profile
- Scroll to the bottom of the page
- Look for the Networks section on the right-hand side
Creating a New Network:
- From the Networks homepage, click “Create a Network”
- Choose a category that fits your research focus:
- Family and life milestones
- Immigration
- Shared experiences
- Local community and chosen family
- Religion
- School and work
- Enslavement, atrocity, and displacement
- Military
- Sports and entertainment
- Burial place
- Or create your own custom category
- Name your network (typically after the ancestor you’re researching)
- Add a description of what you’re trying to learn
- Connect the network to your family tree
- Click “Explore the network” to begin

Working with Your Network: A Step-by-Step Guide
Once you’ve created a network, here’s how to build and utilize it for your research:
1. Add People to Your Network
You can add individuals in two ways:
- Select someone already in your tree
- Add a new person who isn’t in your tree yet
To add someone:
- Click “Add a person”
- Choose to select from your tree or add someone new
- Enter their name and any known information
- Click “Save”
People added this way who aren’t already connected to your tree will be added as “unattached” persons.

2. Add Tags to Organize Your Research
Networks allows you to add tags to categorize your research focus:
- Neighborhood
- Friends
- Fictive kin
- And other relevant categories
These tags help you quickly identify what type of connections you’re exploring and keep your research organized.
3. Upload Media and Records
You can attach documents, photos, and records to your network:
- Click “Add media” to upload photographs or image files
- Use “Add records” to connect Ancestry records or other documentation
- Link these items to specific individuals in your network
This feature helps you keep all relevant information in one place, making it easier to see connections between people and events.
4. Use “Stickies” to Organize Your Research Process
One of the most useful features of Networks is the “stickies” function—digital versions of the stickie notes I love. Here’s how to use them:
- Click “Create” in the stickies section
- Name your stickie (e.g., “Research Plan for Jesse Haley”)
- Add your content, which might include:
- Research questions
- Known information
- Next steps
- Hypotheses about relationships
- To-do lists
- Add optional elements:
- Hyperlinks to relevant websites or articles
- Dates
- Locations
- Status tags (completed, in progress, etc.)
- Click “Save” to add it to your collection
Stickies are perfect for creating simplified research plans, tracking your progress, and documenting your thought process as you work through complex genealogical puzzles.

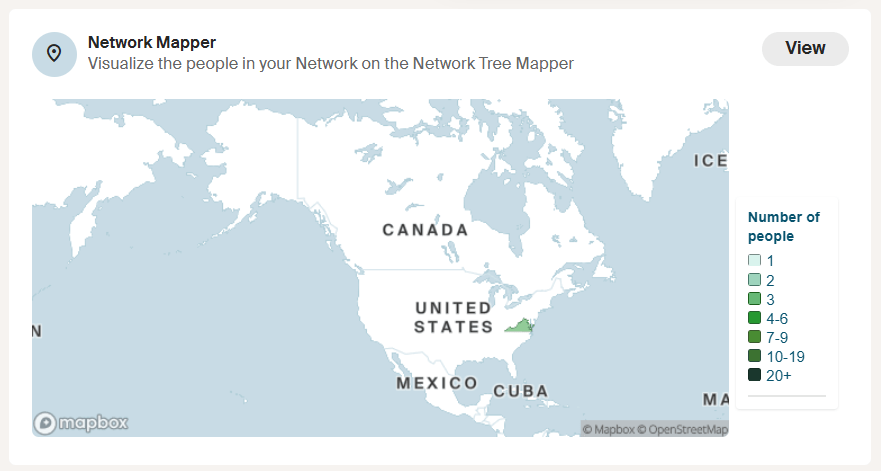
5. Explore the Network Map
The Networks tool includes a mapping feature that visually displays the locations associated with people in your network. This can be particularly valuable when:
- Tracking migration patterns
- Identifying neighbors who lived in close proximity
- Visualizing how a community moved together
- Seeing geographical relationships that might not be obvious in text form
Tips for Getting the Most from Networks
Based on my experience with the tool, here are some recommendations:
- Start with a specific research question. The more focused your network, the more useful it will be.
- Don’t overlook seemingly unrelated individuals. Sometimes the most valuable clues come from unexpected or “fuzzy” connections.
- Document your thought process. Use stickies to record your reasoning and hypotheses, not just facts. I’m a writer, and find this particularly helpful.
- Look for patterns across multiple records. Who appears consistently near your ancestor in different record types?
- Consider creating multiple networks for different aspects of an ancestor’s life. You might have one for their early life in one location and another for their later years elsewhere.
- Review your network periodically. As you add new people and information, you may spot connections that weren’t obvious before.
Final Thoughts
Ancestry’s Networks tool represents an important shift in how we approach genealogical research digitally. By providing tools to document, organize, and visualize the social networks surrounding our ancestors, it helps us move beyond the limitations of traditional pedigree-focused research.
The tool does require a Pro Tools subscription, but it offers valuable functionality for serious genealogists looking to break through brick walls by examining the broader context of their ancestors’ lives.
Have you tried Ancestry’s Networks tool yet? What connections have you discovered? I’d love to hear about your experiences in the comments below!


Thank you for the comprehensive post about how the Networks feature works
Thank you very much for the information. Do you have it on video? I am still not sure what to do after uploading people, media, and sources. Thanks again, Lorie